1: Getting Started
Whether you are experienced in working with digital images or just starting out,
wwwART provides an easy to use yet powerful program to create "ribbeting"
graphics for Web pages. With wwwART, you can create original graphics, scan in new
images, or manipulate existing images with ease.
wwwART supports images from 1-bit line art to 24-bit full color in all the major
Macintosh graphic formats and saves to the most common Web graphics formats, CompuServe
GIF and JPEG.
This manual explains the many features offered by the wwwART program, arranged
by palette and menu.
System Requirements
To use wwwART, you need:
- A color-capable Macintosh (a Mac with a 68020 or greater processor such
as SE/30, Mac II, LC, Performa, Centris, Quadra, most PowerBooks or a PowerMac)
- At least 2 megabytes random access memory (RAM) or 3MB for a PowerMacintosh
- A hard disk with at least 5 megabytes free
- Apple System software 7.0 or greater
- Either internal video or a video card that supports at least 256 grays
or colors
The wwwART Program Package
Your wwwART package should contain the wwwART floppy disks and a license agreement
in an envelope, or a CD-ROM in a sleeve. If anything is missing, please call MicroFrontier
at 1 (515) 270-8109.
NOTE: If you downloaded and purchased wwwART
electronically via the Internet or an online service, then you will not have floppy
disks or a CD-ROM unless you purchased those as well (sold separately).
Before You Begin
Make a Backup of the wwwART program
If you have a floppy disk version, it's a good idea to make a backup copy of the
files on the program disks, just in case anything happens to the original.
The original floppies are shipped unlocked. We strongly recommend that you lock
these disks to prevent them from being accidentally erased or overwritten. Store
the original and backup disks in a safe place.
NOTE: If you downloaded and purchased wwwART
electronically via the Internet or an online service, instead of purchasing it on
disk, then you should archive a copy of the wwwART installer and electronic manual
you downloaded to some sort of removable disk media, in case you ever need to reinstall
it.
Conventions Used in this User Manual
This manual assumes you are familiar with the basic Macintosh operations -- point,
click, drag, open, save, etc. If you are not familiar with these operations, refer
to the manual that came with your Macintosh for more information.
In order to make the manual as easy to use as possible, style variations are used
to distinguish different types of features:
Menu names appear in bold type (the File menu)
Commands in menus appear in bold type (Save As)
Keyboard Shortcuts appear in bold type within brackets ([Command-S])
Palette names appear in bold type (the Tools palette)
Tool names appear in bold italic type (the Pointer tool)
Pop-up menu names appear in bold type (Color Set)
Check/Text box names appear in bold type (Fill With)
Button names appear in bold type (Cancel)
Installing wwwART
It is recommended that you have at least 5 megabytes of free space on your hard
drive before installing. This will insure that the program has enough free space
to install.
NOTE: Although not mandatory, if you are installing from diskette,
we suggest you first restart your Mac with Extensions off by holding down the [Shift]
key until you see "Welcome to Macintosh. Extensions off."
We suggest this because occasionally, Extensions (INITs) may interfere with
the installation (for example, when installing from floppies, you may be asked repeatedly
to insert Disk 1, then Disk 2, then Disk 1, etc.) Turning extensions off prevents
this.
IMPORTANT: If you are installing from CD-ROM, you can use an Extension
Manager to turn off all extension except those necessary for your CD-ROM drive to
function before installing.
To install wwwART, insert the CD-ROM or the first floppy disk in the drive. Double
click on the Install wwwART icon to launch the installer program.
A "splash screen" will appear, followed by another dialog box with important
information about the program and the license. Be sure to read this information
before continuing.
Click the Switch Disk button if you wish to install wwwART on a different
disk than that displayed. Click the Install button if you agree to the terms
of the license and wish to install the program. Click Quit to cancel the installation.
After you click Install, another dialog box gives you the option of installing
a version of wwwART that will work on all Macintoshes (called a "fat binary").
Click Yes to install a "fat binary", or click No to install
a version that will only work on your particular type of Macintosh (680x0 or PowerPC).
Regardless of which button you click, the version of wwwART that is installed will
work properly on the type of Macintosh you are using.
NOTE: During the installation with floppy disks, you will be
asked to insert the other disks as the process continues.
A dialog box appears when the installation is complete. Click the Quit button
to end the installation process.
The installer creates a wwwART Folder at the lowest level within the selected
hard disk.
Double-click on the wwwART icon inside this folder to start the program.

The first time you use wwwART, you will be asked to enter your name, organization
and serial number. Your serial number can be found on the back of Disk 1 or on the
CD-ROM sleeve. Click the Register button to log this information and finish
opening the program.
wwwART Document Windows
wwwART's windows have the same features found in most standard Macintosh windows.
There are also some features unique to this program:
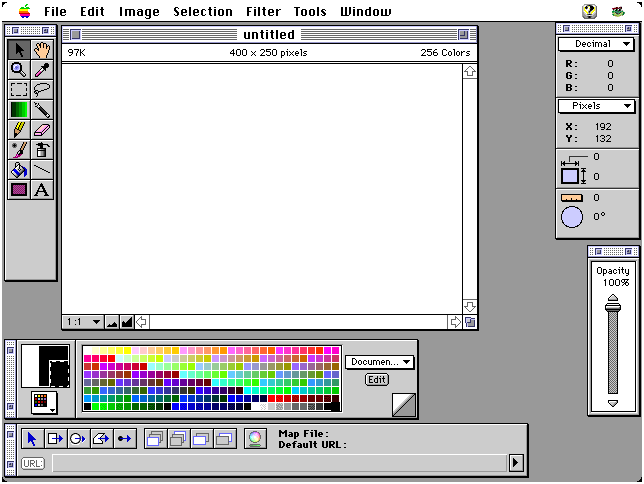
The Tools and other palettes always float above your document. For more
screen space, the palettes can be shrunk to just the title bar by clicking on the
zoom box (upper right corner of the palette). Clicking again expands them.
The Colors palette at the bottom of the Tools palette can be torn off
to display a separate expanded palette. See Chapter
3, The Colors Palette for more information.
 Clicking on the Magnification Pop-up Menu shows
the current magnification or reduction view of the document. You can change the setting
quickly by clicking on the menu and selecting a new level. The Other... [Command-M]
option opens a dialog box that lets you select levels between 1 and 32x.
Clicking on the Magnification Pop-up Menu shows
the current magnification or reduction view of the document. You can change the setting
quickly by clicking on the menu and selecting a new level. The Other... [Command-M]
option opens a dialog box that lets you select levels between 1 and 32x.
Clicking on the Magnification Buttons changes the view level by one step.
Go to Chapter: | Previous | Next
|
| Contents | 1 | 2 | 3 | 4
| 5 | 6 | 7
| 8 | 9 | 10
| 11 | 12 | Tutorial
|
Go to MicroFrontier Web Site